
Now if you've spent much time keeping up with us Cases (Note: I had this blog before the Kardashians' reality show came along. You heard it here, folks.), you'll have realized that we operate on the academic calender and seize said calender's breaks as opportunities to Get Things Done. (That's how it looks on the family calender: big arrow across a swathe of days labeled 'Getting Things Done.' Or if we're feeling particularly fierce, 'Getting S*** Done.' Sorry, but sometimes we're fierce.) Two years ago we did our full bathroom. Last year The Professor tiled our small entryway. This year, we are tackling the upstairs half bath.
This time around we're having to do the bath in small pieces, as we have money set aside. Mainly we're going for functionality for this first stage, as the bathroom has been ripped up for a long time and we're tired of little boys missing the toilet and soaking the backerboard. Gross, yes.
Oh, in case you need a visual, here's how the bathroom looked when we first moved in:
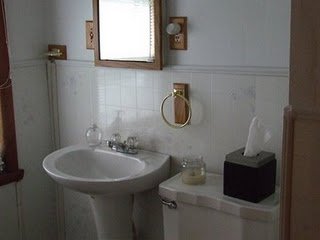
See this post (still one of my most popular) for the gritty details. Basically we were dealing with crappy linoleum flooring and a crappy vinyl wainscoting that made me see red. For some reason this bathroom and its junky fixtures (and precarious sink) made me ridiculously angry, and I asked The Professor to tear off the wall covering and rip out the linoleum about a year and a half ago. I'm not really sure why he didn't make me wait until we were ready to work on it; usually he is really good at telling me to knock it off and suck it up. Whatever the reason, he complied, and we were left with floorboards (which he quickly covered with backerboard) and walls that looked like this:

So obviously the walls had originally been covered in tile (which I realize was popular for a time, but still, it makes NO SENSE, there is NO SHOWER up here), and the resulting gluey mess made us go OHNO because geez, what do you do with that? We debated pulling down the plaster walls, but we've done that before, and it's not something you want to do frivolously. Basically it's something you want to avoid at all costs, which is probably why the crappy vinyl wainscoting was there at all.
We didn't have to make a decision right away, since shortly after The Professor ripped everything up, he started graduate school, and all home renovations were put on hold as we adjusted to a new income level. We've got a good handle on said income now, and decided (after I made a fuss after cleaning up one pee puddle too many) to finally get a move-on with this bath.
(Note: If you and your husband have several small children and you stay at home and he turns to you one day and says, "Honey, I think I'd like to go back to graduate school for several years, which will mean we'll all have to live on a graduate student's stipend...again," you should slap him. I mean, seriously, support him in everything and help him realize his dreams, especially if they are pivotal to his chosen career, but really, he probably needs a good slap just to make sure his head is truly clear.)
We decided, for this first stage, to a) tile the floor, b) find a new sink, and c) put up beadboard wainscoting on the wall behind the toilet and sink. Imagine my delight at the prospect of TILE, real actual TILE, after living with backerboard flooring for so long. And at this point in the homeownership game, The Professor is an expert at tiling. Here, let me show you:

Pretty dang awesome, huh? That's grouted and everything. He is really pleased with his work, and he should be; it looks professional. We wanted to keep with the black-and-white theme that we started with the downstairs bathroom but change it up a bit, and 4" X 4" glossy tiles were our choice. They work great in this small space without being overwhelming and keep with the "old hotel elegance" theme I'm trying to convey with our bathrooms.
Okay, so now we needed a sink. Our old pedestal sink was a poorly-made porcelain death trap that wasn't heavy enough to stay stable. The Professor had built a crude back brace for it, but there was still the very real possibility that our kids could pull the sink onto themselves. We liked the idea of a pedestal sink (we are still in love with The Sink of Our Dreams) and, as always, preferred to find an old antique constructed of quality materials as opposed to a new sink straight off the boat from China. Whatever we found, it needed to be heavy, yet small enough to fit in a confined space without dominating a little half bath.
We found our downstairs sink at a local antique store, and we did find another last weekend at the same store. Unfortunately, antique stores know what they have, and the dealer was asking $180 for it, cracked soap dish and all. $180 is still a lot less than you'll pay for a sink and faucet at, say, Lowe's, but my motto is "Why live in Chicagoland if you're not going to take advantage of the high population and subsequently large amount of Sheer Awesome?" That is to say, I always have confidence I will find just what I need simply by being patient and casting my net just a leetle farther north, to the city. A willingness to drive also helps.
My motto once again came through. We found an antique cast iron pedestal sink, similar to our first, for $45 on Craigslist. Here it is, waiting in our basement until the day my husband can recruit some poor fool to help him move it upstairs:

Sure, we'll have to have a plumber do a custom hook-up, due to the antique nature of the plumbing. Sure, we'll have to keep the hot water disconnected, since there's no hot/cold mix on this old faucet and we don't want our kids getting their hands burned. But hey. This sink rocks in every way, and we're pretty stoked to have scored it for so cheap. At this point we're pretty wise to the ways of cast iron sinks, and this is a gem. Bonus: the faucets are made by Chicago Faucet, and the sink itself was original to a sweet old brownstone in Chicago. (Yes, we drove to the city for a dirty old sink. Yes, this is our idea of fun.)
So all that's left in this leg of the remodel is putting up beadboard on the back wall. I'll keep you updated as we improve this bathroom, bit by bit. No telling how long it will take to finish completely, but as long as we can do a little at a time, it shouldn't take too long.
Now please praise my husband and his abilities in the comments. Thank you. May your days be merry and bright, and may all your dirty old cast iron sinks be white and free of chipped enamel.
3 comments:
Wow! This looks amazing. I love the tile and it does look professionally installed. I really love the sink. I love that it's a pedestal but there is space to put things on the side. It's a gem for sure! Great work!!!
Love the tile!!! S did a WONDERFUL job! I love seeing your home improvement blogs...
that is a beautiful sink!
Post a Comment